Transactions
Record, post, edit, check, split, and manage transactions in Bkper — from your first entry to batch operations.
Transactions are at the heart of Bkper — they track the movement of value between Accounts, keeping your financial records accurate and always balanced. The more transactions you record and post, the smarter Bkper becomes, automatically recognizing patterns and completing entries for you over time. For a deeper look at the model, see Core Concepts — Transactions.
Recording a transaction
You can record transactions using any text, file, or URL as input. Entries can come from the Bkper web app, mobile app, Google Sheets (via the Bkper Add-on), Bank Connections, email, or other user connections.
Type a description in the input field at the bottom of your Book. For example, if you took a taxi ride for $25 and paid in cash, type Taxi 25 and press the Post button.
At this point, the transaction is recorded in a Draft state. Bkper hasn’t assigned any accounts yet, so it remains incomplete and no account balances are updated.
Hashtags in descriptions
Adding hashtags to a transaction description — like Office supplies 150 #inv4821 — makes the entry instantly searchable and helps the Bkper Agent learn account patterns. Click any hashtag to filter all transactions carrying that tag. Hashtags also enable segment reporting: balance values cross-referenced by hashtag across accounts, useful for tracking projects, departments, or cost centers without adding accounts.
Attaching files
You can attach receipts, invoices, and other documents directly to any transaction using the Attachments feature — via the paperclip icon, drag-and-drop, or by forwarding emails to your Book. Multiple files per transaction are supported, with a 20 MB limit per file. Images and PDFs render inline for quick review.
External links
You can also add external links to a transaction — URLs pointing to invoices, documents, or resources in other systems. Paste a URL in the input field when recording, or click the link icon on an existing transaction. External links complement attachments: link to the source and attach a local copy.
Transaction identifiers
When importing or exporting transactions (for instance, via Google Sheets), Bkper uses different types of IDs to prevent duplicates and enable updates. See the Unique, Transaction, and Remote IDs guide to understand how external IDs map to Bkper transactions.
Posting a transaction
To post a transaction, press the green >> or red >> button at the beginning of the transaction. If accounts aren’t yet assigned, click the red >> symbol to open the form and assign the From Account and To Account:
- From Account — where the value is coming from (e.g. Cash)
- To Account — where it’s going (e.g. Transport Expense)
Once posted, the transaction moves to the Unchecked state and your account balances are updated. Bkper also learns this pattern for future transactions — type Taxi 30 next time and it will automatically suggest the same accounts.
Transaction states
Every transaction moves through states that keep your financial data accurate, auditable, and always under your control.
Draft
When you record a new transaction, it begins as a Draft. At this stage it does not affect account balances. A Draft can be incomplete (red >>) if it’s missing a date, amount, From Account, or To Account — or complete (green >>) and ready to post. Trashed Drafts can still be recovered.
Over time, the Bkper Agent learns from your entries and completes more records for you.
Unchecked
Once posted, a transaction moves to Unchecked:
- It updates account balances and becomes part of your financial records
- It can still be edited, trashed, or recovered
- It can be checked to lock it for accuracy
Checked
A Checked transaction is locked for financial integrity:
- It cannot be edited, preventing accidental changes
- It cannot be deleted, keeping your records secure
- Only users with edit permissions can uncheck it if adjustments are necessary
Trashed
When a transaction is trashed, it moves to the trash bin instead of being permanently erased. Both Draft and Unchecked transactions can be recovered. Checked transactions cannot be trashed.
Searching transactions
Use the query language to filter transactions by status, account, date, amount, or description. Status operators like is:draft, is:checked, and is:unchecked let you find transactions in a specific state — combine them with account and date filters for precise reporting, such as is:unchecked account:Cash after:$m-1 to find all unchecked cash transactions from the last month.
Editing a transaction
To modify a transaction, click the pencil icon at the beginning of the transaction.
Transaction properties
You can attach custom properties to individual transactions — invoice numbers, purchase order references, receipt URLs, or any per-entry metadata that doesn’t belong in the description. Open a transaction for editing and expand the properties section to add key/value pairs.
Properties keep transaction descriptions clean while making structured data available for search, reporting, and automations. See the Properties guide for details.
Checking and unchecking
To check an Unchecked transaction, click the gray check icon — this locks it from further modifications. To uncheck a Checked transaction, click the green check icon. Only Book Owners or users with Edit permissions can uncheck transactions.
Comments on transactions
You can leave comments on any transaction — requests for a collaborator, notes explaining why an entry was recorded, or audit context. Mention a teammate with @username and they receive an email notification; they can reply directly to the email, and Bkper adds the reply (plus any attachment) as a new comment on the same transaction.
Trashing and restoring
To delete a transaction, click the trash bin icon at the end of the transaction. To restore a deleted transaction, click Trash in the left menu, find the transaction, and click the restore icon at the beginning of the transaction.
Split transactions
In Bkper, each transaction has exactly one From Account and one To Account. To split a transaction across multiple accounts, use an intermediate account to break the total into its component parts.
Imagine a $100 purchase at a supplier using a credit card, where $60 is for office materials and $40 is for a maintenance service. Record it in two steps:
First, record the total payment to the supplier:
| Date | Amount | From Account | To Account | Description | |
|---|---|---|---|---|---|
| 01/15/2026 | 100.00 | Credit Card | >> | Supplier | Total purchase |
Then, split the expense using the supplier as the intermediate:
| Date | Amount | From Account | To Account | Description | |
|---|---|---|---|---|---|
| 01/15/2026 | 60.00 | Supplier | >> | Office Materials | Office supplies |
| 01/15/2026 | 40.00 | Supplier | >> | Service Fees | Maintenance service |
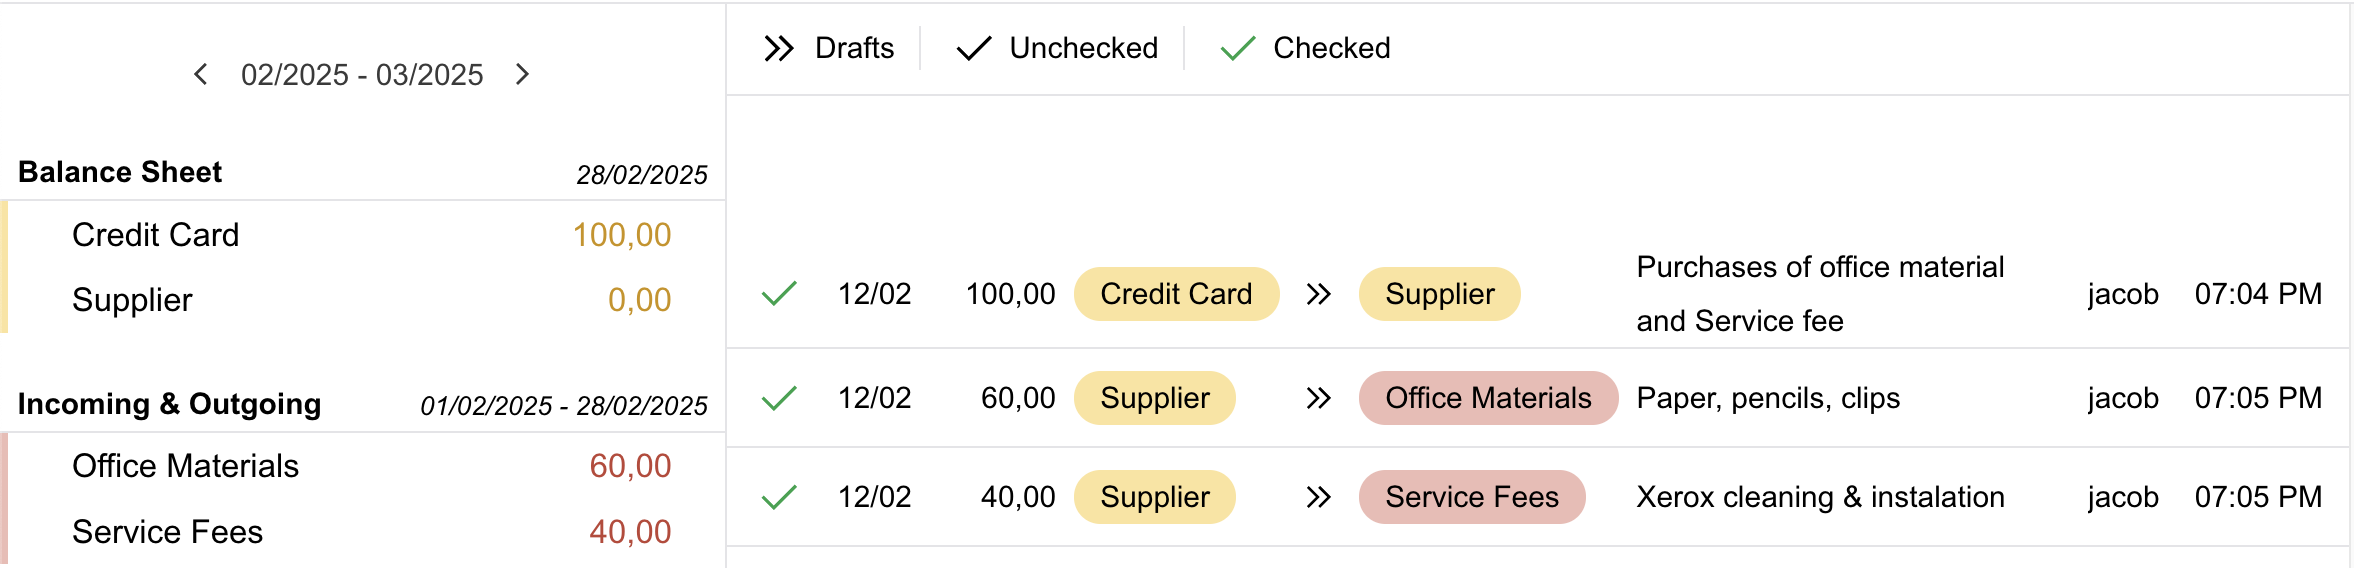
This ensures the credit card’s running balance matches its statement and expenses are properly categorized. In this example, the Supplier account acts as a temporary clearing account that is fully cleared by the two split entries.
Batch operations
Copying a transaction
Select a transaction using the checkbox, then click the + button in the input bar to open the input form in order to copy it. Post the transaction from the form to paste it as a new Transaction.
Merging transactions
Select two transactions using the checkboxes, then click the merge button in the top menu.
Merging creates a new transaction that combines the data from both originals. The merge button only appears when exactly two eligible transactions are selected — neither can be checked, trashed, or locked. When merging, Bkper gives priority to transactions from connected banks over manually created ones. If both come from the same source, the older transaction anchors the result. Accounts, description, properties, URLs, and attachments are merged together — the priority transaction’s values win on conflicts, while the other fills in any gaps. If either original has a remote ID from an external source, both IDs are carried over to the merged transaction to prevent future duplicate imports.
After the merge, the two originals are sent to the Trash and the merged transaction is posted if at least one original was posted, or saved as a draft if both were drafts. To undo a merge, restore the originals from the Trash and delete the merged transaction.
Batch editing
Select two or more transactions, then click the pencil icon in the top menu to edit them in bulk. Batch edits on draft transactions do not post the modified transactions.
Batch deleting
Select two or more transactions, then click the trash bin icon in the top menu to delete them at once.
Related
- Record Guide — detailed recording workflows, including date and amount formats, account completion, and the record form
- Record by Email — record transactions by sending an email to your Book